3.30.2012

Happy Birthday to Me

My birthday is not today.  My birthday was actually over a week ago.  But since my birthday present just came in the mail today, my new birthday for the year must be March 30th.  And it just so happened that I received one of the best birthday gifts EVER {although I may be biased because I usually say that about every gift I receive}.  Either way, it is pretty cool.  What, oh what could it be?


Nope, not another dog {I wish}.  I got a camera!  Woohoo!!  So naturally, I spent my day taking some pictures of my favorite subject.


Thankfully, he was loving the camera.  Not so thankfully, he kept trying to lick it.


He was definitely the focus of my day, mostly because he was the only thing I could find that moved.


I would NEVER have captured those last two photos on my point and shoot.  So thanks for my present family, I sure am loving it.  I have so much to learn about it but am excited for the possibilities.  


3.27.2012

iphone monday

Yes, I am aware that it is actually Tuesday today.  Yes, it took me until 8:30 this morning to actually realize that.  It just feels like a Monday to me, so let's just go with it for today.  Last week was one of those crazy weeks that seemed to completely fly by.   


Here's the rundown in no particular order:
1.  I started my first fieldwork experience for grad school {and was very very nervous about it!} 2. Bos made a new friend and wouldn't stop following her around.  3.  I got rear ended {boo} 4.  The grass turned green on my birthday. 5.  Boston lost his man parts {also on my birthday} and was a huge baby about it. 6.  Speaking of birthday....I ate some cake that husband kindly whipped up for me 7.  We also learned that B LOVES basketball.  And he is pretty good at defense.  8.  There were a few naps over the weekend.  

Since this week is my "off" week from school, I am hoping to find some time to work on a few more projects.  Free time will be sparse in the next three weeks, so bear with me as I plow through the end of my second semester of grad school!

3.19.2012

This Weekend

We had a pretty busy schedule this past weekend.  Thankfully, we were able to squeeze in some family time yesterday and enjoy the beautiful weather.  It has been awhile since B has been around a lot of other people/animals, so we decided to take him on a little hike.


He was so excited to be in the car, he couldn't stop panting.


Sitting backwards in the seat, good thing he didn't get sick.


Dad had to control the leash because he was a psycho dog as soon as he got out of the car {it may or may not have involved me chasing him around the park for a solid 10 minutes while he ran away}.


He was more than ready to jump in the water, which only had a tiny bit of ice left on it.  


After a long day of running around in the warm weather, he was happy to get back in the car.  


Nothing better than a sleepy puppy.

3.16.2012

Monogrammed Ottoman

Remember this lovely guy?


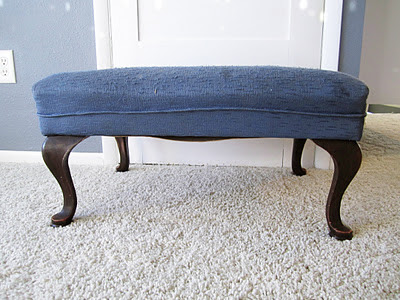
I bought him awhile ago to go in my reading nook, and he has just been waiting to undergo a sex change.  Do you ever have it where you just can't seem to find the right fabric?  It happens to me all the time.  I have an idea in mind, but it never seems to exist.  For this ottoman, I wanted something neutral and light that would look good with my white chair.  I roamed aimlessly around Jo-Ann for a good 30 minutes before I stumbled across this fabric.


It's simple, it's plain, and it was exactly what I needed {although not at all what I had been looking for}.  The transformation of this ottoman was fairly simple.  I removed the legs and gave them a nice little paint job.

{I swear I took a picture of these steps but they upped and ran away...}

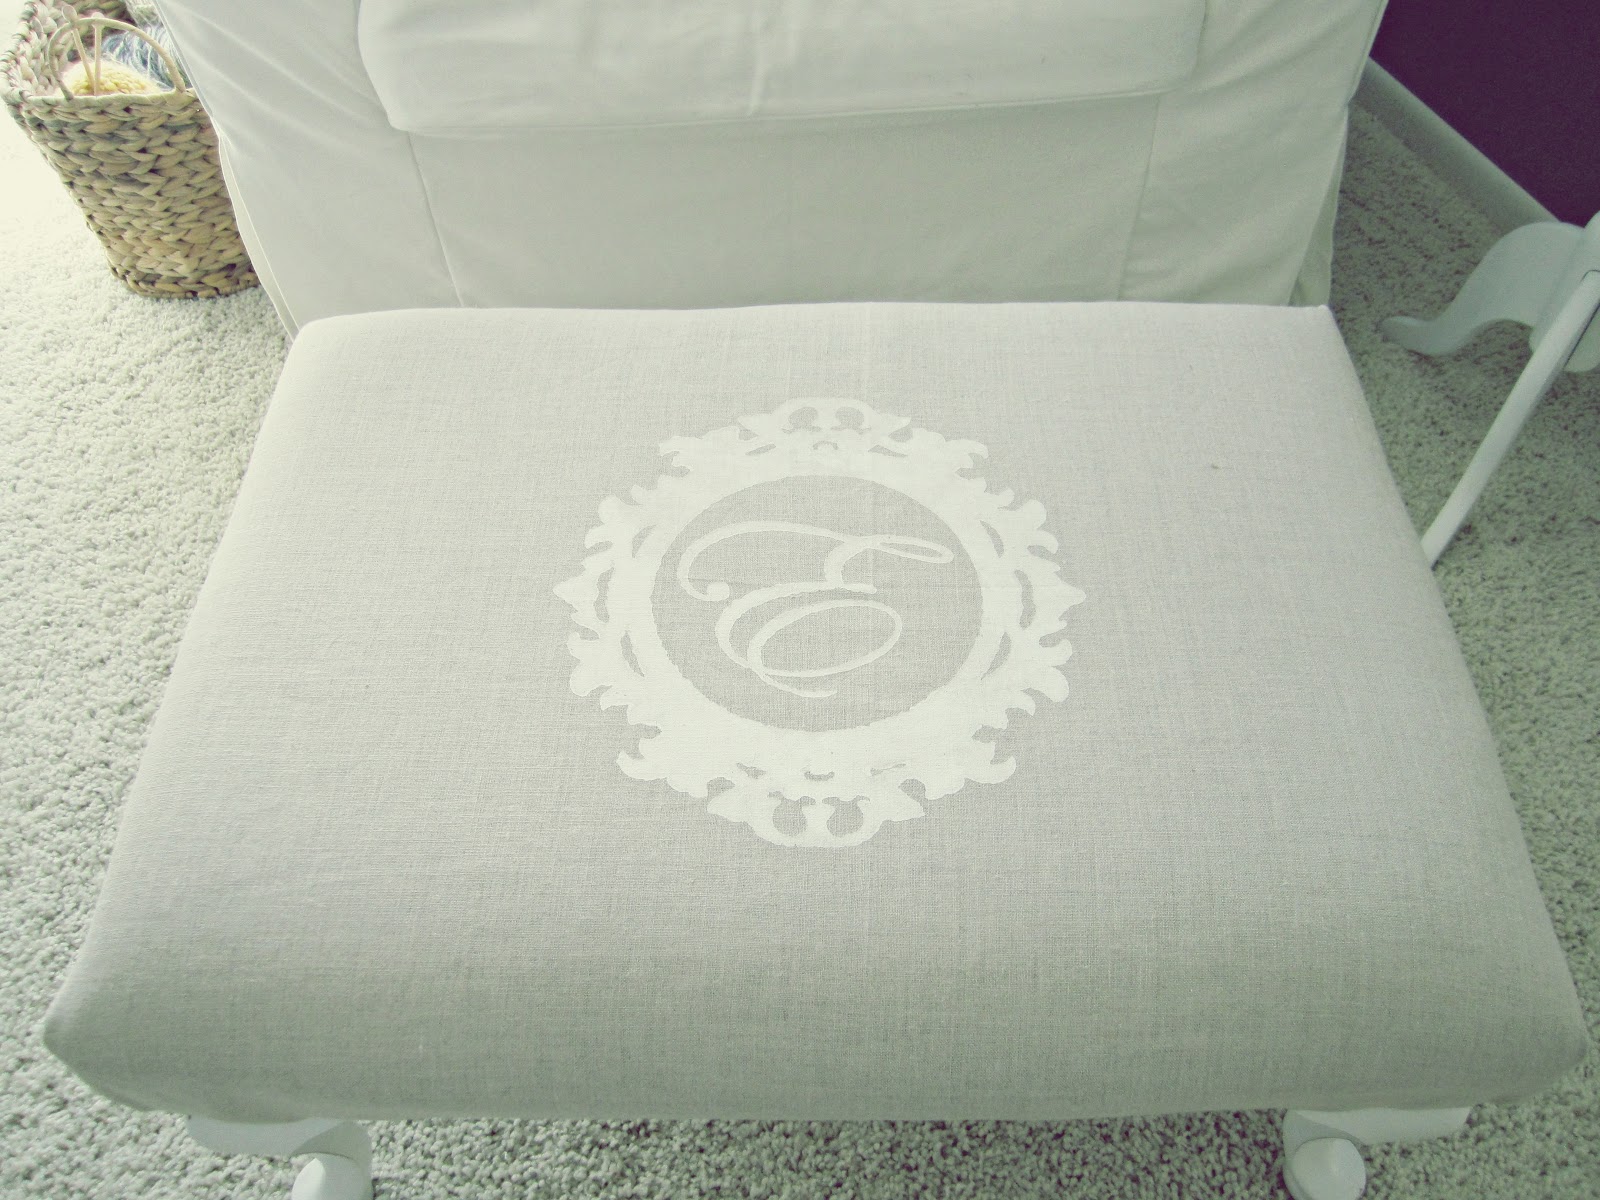
I then covered the top of the ottoman with my new fabric.  See the piping in the original picture?  Ya, we just ignored that and put the fabric right over.  Now we get to the fun part.  Sometimes, the little details of a project are what makes it really come together.  When I picked the boring and simple fabric, I knew I was going to have to come up with something to spice it up.  I turned, of course, to my trusty Silhouette Cameo and cut out a little monogram design that I partly downloaded and partly created.  I used contact paper once again in order to stick the stencil to the fabric.  After combing white acrylic paint with textile medium, I carefully blotted the paint over the stencil.


I was a little nervous the paint would seep right through the contact paper {it doesn't stick very well to fabric}, but apparently the blotting technique was key because she turned out beautifully.


Her legs aren't looking too shabby either.


She was definitely a girl all along.  


It is exciting to have one more nook project complete, but there are still a few things that need to be done.


1.  New paint color.  It looks crazy blue in this picture and it makes me hate it even more.  I'll get around to it sometime in 2012, but I just really want to make sure I find something I love.  Husband says it needs to last longer than a year.

2.  Textiles {not blue}.  The chair really needs a nice pillow or two and those knitting supplies in the basket beside the chair are begging for some action.  I'm thinking a lovely knitted blanket would provide just the perfect amount of coziness for this space.

3.  Lighting.  I had to rob the lamp from beside my bed to use for now since this little corner gets very dark. I'm starting to miss it though so I'm on the look out for an awesome idea {preferably something that hangs}.

That's all for now.  Have a great weekend and make sure to do something outside!

Linking up:


3.14.2012

Things I Love

source
source
source
source

are you sensing a theme here?  i love tea, plus i love the look of little vintage cups.  it was inevitable that eventually the day would come when i would start collected these little beauties.  well, that day happened to be yesterday.


purchased for 50 cents a piece at goodwill and i couldn't be happier.  have any old tea cups you would like to donate to my new obsession?  feel free to hit me up :)


3.12.2012

large wall clock

As I was posting the video last week, I thought to myself..."has it really been two weeks since my last post?"  I shouldn't have even had to ask myself since I was kindly reminded by a few people {mom}.  But seriously, I have been consumed by school and had nothing of interest to put on this dear little blog.  So unless you wanted me to bore you with a 354,230 pictures of my dog...


Oh woops, finger slipped.  Anywho, seeing that two week gap made me realize it was time to pull myself together and be productive.  In honor of daylights savings, I chose to finish up a clock that I had been putting off for awhile.  I love the look of giant wall clocks, but they can be so spendy.  The solution, of course, is to simply make it yourself.  I started out with a piece of plywood that the hubs kindly cut out for me.  In order to make a perfect circle, he found it easiest to take a piece of wood the size of a paint stir stick and drill a small hole on one end.  He then nailed the wood to the piece of plywood, stuck a pencil in the drilled hole, and traced a circle.  Such a smarty pants.


After the circle was traced and cut, I made life even more difficult for him and requested that he cut lines in the wood to make it look like it was planked instead of a solid piece of plywood.  Of course he said yes and cut the lines about half way through the board.


The rest of the project was on my shoulders.  After sanding and priming the board, it was time to pick out the colors and design for the clock face.  I chose to use black paint for the numbers and leftover off-white paint for the face.  I gave the entire clock two coats of black paint.


My Silhouette Cameo was a huge timesaver for this project.  I googled different wall clocks until I found fonts/layouts that I liked and then recreated it with my Silhouette software.  The obvious next step is to cut the numbers out of vinyl, but vinyl is way too expensive to be wasting like that.  Instead, I use black contact paper as a replacement.  It is super cheap to buy in a huge roll and does the exact same thing as vinyl.  The hardest part of the whole project was lining up the words/numbers just right.  Once I had them all on, I went over all of the contact paper with another layer of black paint to make sure to seal the edges from paint seepage {it still seeped, but I didn't mind the look}.


The clock face needed two coats of white paint, and before it was completely dry I went ahead and pulled of the letters/numbers {most rewarding part by far}.

The final step of the project is to assemble the clock hands/motor.  I found a clock kit for $20 from Coastal Tide Clocks on Ebay.  The diameter of my clock is 30" and I purchased the 14" hands.


Total cost of the project:

Clock kit-$20
Black paint-$3
Plywood, white paint, contact paper-$0 due to having it on hand.


Linking up here:
Serenity Now
The Rooster and the Hen